Step By Step Instructions for Uploading Full-Service Jobs to PostalOne!
This technote will assist you in creating and uploading the maildat files in your presort folder to PostalOne! for the purpose of full-service compliance.
Visit gateway.usps.com and login.
Find your Mailer ID, CRID, and Permit Number. Write down any of those numbers that you didn’t already know.
To find your Mailer ID, click on Mailer ID on the right side of the gateway, under Favorite Places. If there isn’t a button for Mailer ID, click on Edit Favorites, then check the Mailer ID box. Now that button will appear.
To find your CRID, click on Postal Wizard. Click on Manage Permits. There you will see your CRID. Click on your company name to find your permit.
On the left side, click on Electronic Data Exchange.
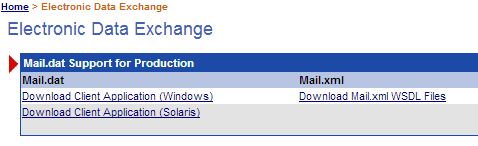
Right click on Download Client Application (Windows), then choose Save Target As or Save Link As. Save this file to the root level of C:.
After the file has been downloaded, browse to the C drive and look for a file named MDRClient-win32-PROD.zip.
Right-click on that .zip file and choose Extract To Here or Extract All or Extract To MDRClient-win32-PROD. That should create a folder named MDRClient-win32-PROD. Leave that for now. You’ll be using that folder later. Close the gateway web page.
Presort and prepare the maildat files in AccuZIP6.
Launch AccuZIP6.
Open your database.
Validate it with the NCOALink box checked.
Pull down the Sort menu to Presort Mail.
Click on the Intelligent Mail Setup link.
For the class of mail you’re presorting, make sure your Mailer ID is entered.
Double-click on the service type and choose a service type that has the word FULL in it. If you didn’t sign up for any special services when you obtained your Mailer ID, choose a service that has Manual Corrections (Full) or No Services (Full). If you are an AccuTrace subscriber or are tracking mail using something other than AccuTrace, choose a service type with (Full-IMB Tracing).
Click OK.
In the Presort Setup window, make sure Full Service IMB Rates is checked, along with Machinable and Print Barcodes.
![]()
If you are preparing Enhanced Carrier Route letters, make sure “Include Non ZIP+4 Records” is unchecked.
The ZIP Code you enter into the Mail Drop Setup should be the ZIP Code of where your permit is held.
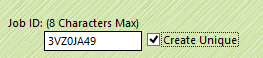
Make sure the Create Unique box is checked to the right of the Job ID box.
Give the presort folder a specific name, which will help you select the correct presort folder when it comes time to browse to that folder while logged into PostalOne.
Uncheck the Overwrite box, if it exists. Make sure your other presort settings are correct, then click Presort.
Presorting takes you to the Print Presort window.
Additional preparations for the maildat files that were created by the presort
Click on Print Tags. Check the Create PDF box and the Intelligent Mail box. Click Print.
Click on Print Labels. Choose Disk File from the Output pull down menu. Choose All Records. Click Continue. If you’re exporting, you can do your export at this point. Otherwise, close the Export Setup window and return to Print Presort.
Click on Print Reports. Make sure the Mailing Statement box is checked and the box beneath it is not checked. Check Create PDF. Click Print.
Now the maildat files in your presort folder are prepared. Click on the Presort Path.

In the Open window, click on the folder button to the left of the address bar (pictured below):
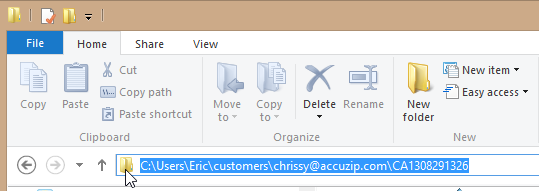
Press CTRL+C to copy that path. Later, you’ll paste this path into an Open window after logging into PostalOne.
Validate your presort at PostalOne!
Browse to C:\MDRClient-win32-PROD
In that folder, double click on run-mdclient.bat. Click Run if you’re prompted to do so.
Sign into PostalOne with your gateway login credentials.
At the top of the PostalOne! screen, click the Job Validation/Upload button.

Click on Add Jobs.
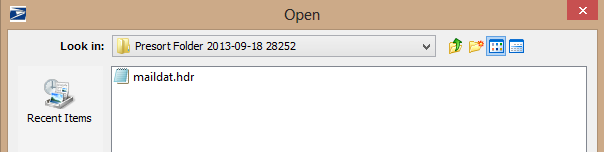
In the Open window, your cursor will already be in the File Name box. Press CTRL+V. This will paste your presort folder path into the Open window.
Now double click on the only file displayed in the Open window: maildat.hdr.
Choose the Validate Only option and continue. If validation fails, click on Details, then export the validation error and email that to the AccuZIP6 support department along with your presort folder, and we’ll try to determine why it failed.
If validation is successful, then click on the Job Validation/Upload button again, click on Add Jobs again, select the same maildat.hdr file, and this time choose Validate and Upload.
Continue past that screen, click Next or OK when prompted, and when the upload is successful, you will have successfully uploaded your job to PostalOne, and you’re ready to take your mailing to the post office! Close the PostalOne screen. If you want to see your job on your dashboard, go back to the gateway.usps.com page, click on Dashboard on the left side, enter the proper date range with the page's calendar, and you'll see the job.
Make note of your Job ID, which will be displayed when your upload is successful.