Create the IMpb and Shipping Services File (SSF) for Parcel Mailings
Effective January 26, 2014, all commercial packages must include:
-
A unique Intelligent Mail® Package Barcode (IMpb®)*
-
A unique Intelligent Mail Matrix Barcode (IMmb)
-
Submission of electronic Shipping Services File v. 1.6 or higher** for each mailing.
The instructions below will guide you through successfully printing or exporting the Intelligent Mail Package Barcode, creating the Shipping Services File that needs to be electronically submitted to the USPS, and information on how to submit the Shipping Services File.
To successfully print the Intelligent Mail Package Barcode, you need to enter your Mailer ID into the IMpb section of the Intelligent Mail Setup window, and select a service type.
AccuZIP6 Mailing Software is certified by the USPS for the Intelligent Mail Package Barcode (IMPB) and Intelligent Mail Matrix Barcode (IMmb). Be assured that all shipping labels generated with AccuZIP6 are secure, accurate, and trackable according to USPS rules and requirements.
Section 1: Choose your IMpb Service Type in the Intelligent Mail Setup window
Launch AccuZIP6.
With or without a database open, pull down Additions to AccuTrace > Intelligent Mail Setup.
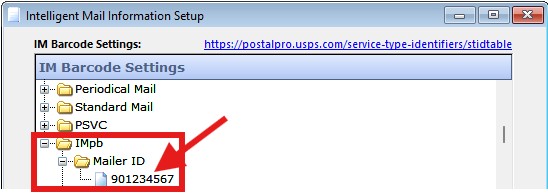
Scroll down to the IMpb section.
Enter your IMpb-specific Mailer ID, which should be different than the Mailer ID that you use for letters and flats (see the recommendation below)
|
Note: We recommend you choose a Mailer ID that will be used specifically for IMpb creation. Here's how you do it.
|
Double-click on Service type.
- For Marketing Mail, choose 704=USPS Marketing Mail Parcels
- For First Class Mail, choose 001=First-Class Mail Parcel
- Click OK, then click Yes to save the changes.
Section 2: Presort your database
- If you have validated your list already, then pull down the Sort menu to Presort Mail.
- Make sure your presort settings are correct, then click Presort.
- In Print Presort, click on Print Reports.
- Check the Mailing Statement box. Uncheck the box beneath it. Click Continue.
- Select a saved customer setting or create a new one and save it. Click Continue.
- In Print Presort, click on Print Labels.
- If you're printing your addresses and barcodes directly out of AccuZIP6 and for the purpose of certifying the IMpb, read Section 3.
- If you're exporting your presorted data out of AccuZIP6, skip to Section 4.
Section 3: Select your Label Template
- From the Template pull-down menu in Print Settings, select the appropriate template:
- For Marketing Mail, choose 5164 Impb With Gs1.lbx
- For Ground Advantage, choose 5912 IMpb with GS1 Ground Advantage.lbx
- Check the Print Barcode box.
- Check the Intelligent Mail box.
- Skip to Section 5, below.
Section 4: Export the Intelligent Mail Package Barcode (IMpb) and Intelligent Mail Matrix Barcode (IMmb)
If you're not printing the IMpb out of AccuZIP6, you'll need to reach out to the USPS for IMpb certification. You don't need to do this if you print labels out of AccuZIP6, as AccuZIP6 is already certified for printing these labels.
You can call 1-877-264-9693, option 1 to reach USPS Addressing & Geospatial Technology for IMpb testing/certification. Certification is a requirement in order to mail pieces with IMpb and IMmb.
- From the Print Settings window, make sure the Output pull-down menu is on Disk File, then click Continue.
- In the Export Setup window, select your export map or choose the fields you'd like to export.
- To Export the barcode, create a new line that is at least 60-characters wide. In the name column, type: IMpb. In the expression box, use this expression:
| oPrintBc.Codeimb128c(impb_,0,1) |
To export the human-readable string below that, create a new line that is at least 60-characters wide. In the Name column, type hr_impb or give it whatever name you'd like (up to 10 characters) and enter this expression into that row's expression box:
| oPrintBc.CalcMod10(impb_,1) |
To export the Intelligent Mail Matrix Barcode, create a new line and name it immb. Make the Length a width of 60. Use these expression in the row's expression box:
| oPrintBc.codegs1datamatrix(impb_) |
- Re-save your export map. Choose your export format, and you're ready to export.
For the export format, do not choose CSV. The data resulting in the export of the impb might contain commas, and this will force the barcode to be split into multiple fields. Export this file as tab delimited text or another format other than csv.
Using these two expressions, you'll get the IMpb and the IMpb Human Readable Line. The barcode will look like this in a resulting text file:
ÍÊJ)""Ê}Â,!*zÂÂE(ÂUHSÎ
When assigning a font to the IMPB, use IDAutomationC128L, Regular, Size 15.
If you're exporting the IMpb, refer to the USPS Intelligent Mail Package Barcode specifications for generating the IMpb.
https://postalpro.usps.com/shipping/impb/BarcodePackageIMSpec
Your labels will need the Intelligent Mail Matrix barcode as well. This barcode must be in GS1-128 (Code 128, Subset C) format, printed in at least 300 DPI for USPS readability. Refer to this documents for IMmb specifications:
https://postalpro.usps.com/shipping/immb/2d-immb-guide
Section 5: Electronically submit the Shipping Services File (SSF)
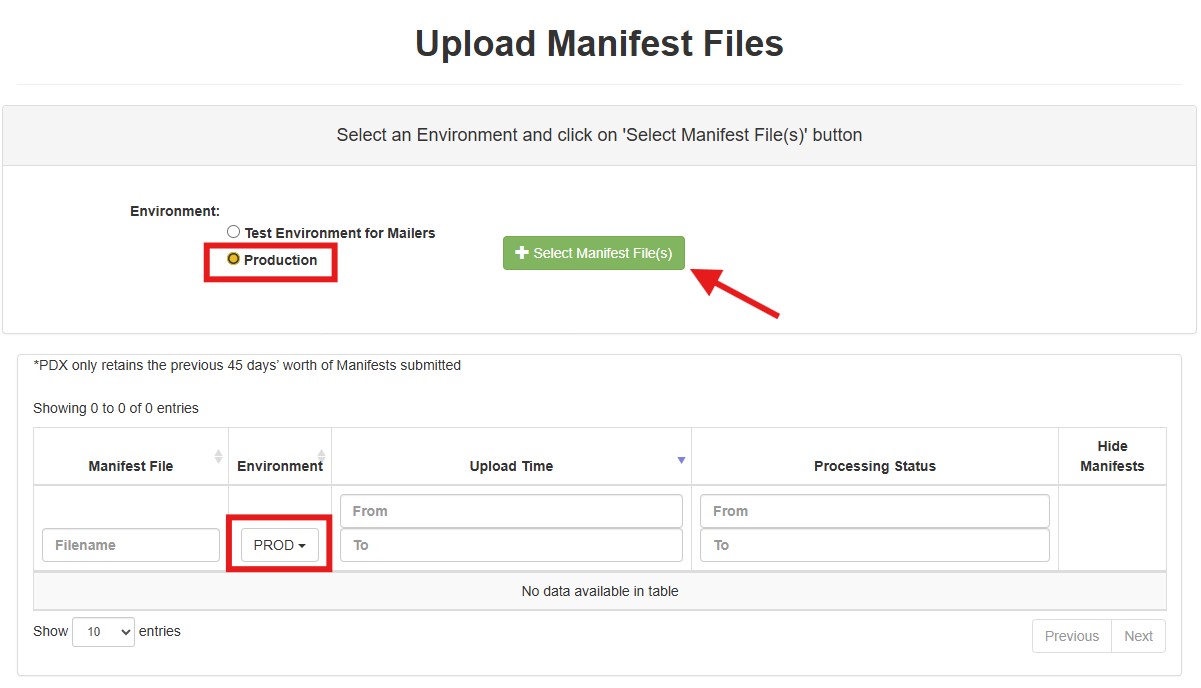
When you click Print or Continue from the Print Settings window, a file with a .manifest extension will be created in your presort folder (more on this, below). This is your Shipping Services File (SSF version 1.7) that needs to be submitted electronically to the USPS through the Parcel Data Exchange (PDX) service. You can quickly access your presort folder from the Print Presort window by clicking on the Presort Path link.
Find the Parcel Data Exchange (PDX)
- Visit the Business Customer Gateway (gateway.usps.com)
- Click on Shipping Services
- Find Parcel Data Exchange (PDX) and click on Go To Service