Submit Postal Paperwork Electronically in 3 Steps
You can submit postal paperwork to the USPS electronically and take only the Confirmation Page to the post office with your mail by following three basic steps:
- Download the PostalOne app from the USPS
- Upload USPS Paperwork Electronically using the PostalOne App
- View the Mailing Statement on the Dashboard/Print Confirmation Page to take with your mail to the post office
STEP 1: DOWNLOAD POSTALONE APP FROM USPS FOR ELECTRONIC PAPERWORK SUBMISSION
- Visit gateway.usps.com
- Log in with Business Customer Gateway credentials
- In Favorite Services, click on Dashboard
- On the left side navigation bar, click on Electronic Data Exchange
- In the MAILDAT SUPPORT FOR PRODUCTION area, click on Download Client Application (Windows 64-bit)
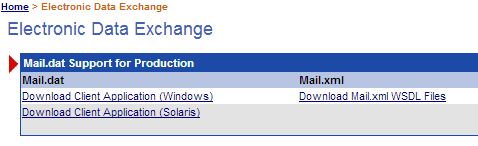
Note: In Electronic Data Exchange, there are also sections labeled Pre-Production as well as Testing Environment For Mailers. Make sure you're downloading from the Production section.
- Once downloaded, extract the MDRClient-win64-PROD.zip file
- After extraction, open the MDRClient-win64-PROD folder
- Right-click on run-mdclient.bat and choose Send To > Desktop (Create Shortcut)
- On the desktop, rename the run-mdclient.bat shortcut, calling it PostalOne
STEP 2: UPLOAD USPS PAPERWORK ELECTRONICALLY TO POSTALONE
- Launch PostalOne from your desktop
- Log in with Business Customer Gateway credentials
- At the top navigation bar, click on the Job Validate/Upload red button
- Click on Add Jobs
- Browse to your presort folder and select maildat.hdr
- Choose Validate Only
- Click Validate
- If you get a Validation Failed message, visit AccuZIP Live Chat immediately to learn how to fix the error.
- If you get a Validation Completed message, then:
- Close the Validation Status window
- Click on Job Validation/Upload
- Select your maildat.hdr file again and then choose Upload After Validation
- When Upload is complete, close the Upload Status window. You're ready to view your mailing statement on the dashboard and print your confirmation page
STEP 3: VIEW MAILING STATEMENT ON DASHBOARD/PRINT CONFIRMATION PAGE TO TAKE TO POST OFFICE
- Log into Business Customer Gateway
- In Favorite Services, click on Dashboard
- Click on the Search button
- When you see your job listed, click on the link in the Postage Statement column
- Click on Confirmation Page
- Click on Printer Friendly Version
- Print this and bring the cover page and Confirmation Page to the post office with your mail.
NOTE: You may need to also bring the PS Form 8125 which will be in your edocumentation.pdf file, located in your Presort folder, if you're drop shipping to an SCF, NDC, or to DDU's that are different facilities than where your permit is held, and if you're not drop shipping with eInduction.