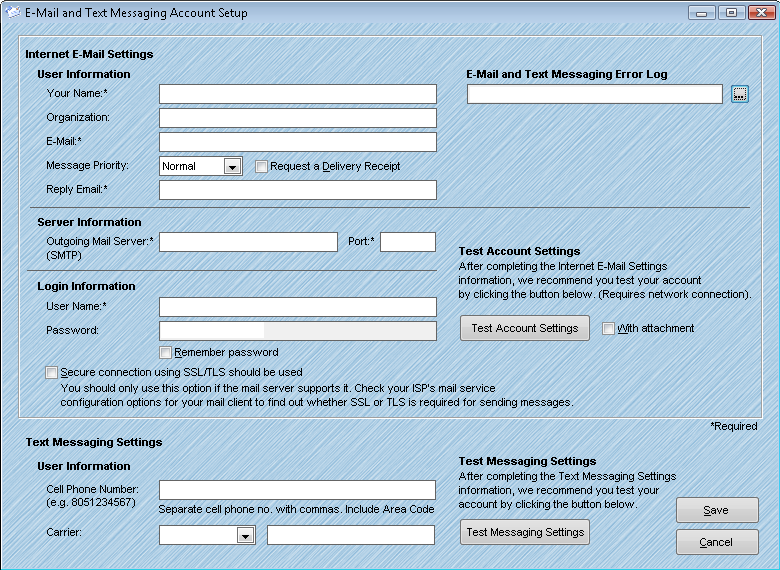
To configure the advanced scripting features for sending e-mails and text messages, you'll first need to configure AccuZIP6 5.0 to access your e-mail and text messaging accounts. To do so, select "E-Mail and Text Messaging Account Setup" from the File menu in AccuZIP6 5.0. You will be presented with the following screen:

Email Setup
To configure your e-mail settings, use the information listed below. Required fields are noted with an asterisk (*).
User Information
Your Name* - Type your name the way you want it to appear to other people.
Organization - Type your company name the way you want it to appear to other people (if desired).
E-Mail* - Type the complete e-mail address that was assigned by your e-mail administrator or ISP. Make sure to include the user name @ domain name, for example, paula@example.com.
Message Priority - Choose whether to send your e-mails with High, Normal, or Low Priority. Normal is the default selection.
Request a Delivery Receipt - Check this box to request a delivery receipt from the recipient.
Reply Email* - Type the complete e-mail address that you wish any replies to be directed to. This can be different than your chosen outgoing e-mail address. Include the @ domain name.
E-Mail and Text Messaging Error Log - Click the Browse button to automatically log any errors generated while attempting to send an e-mail. This file is automatically given a .log extension.
Server Information
Outgoing Mail Server (SMTP) * - Type the complete name of the server provided by your ISP or mail administrator. Often this is smtp. followed by your domain name, for example, smtp.example.com.
Port * - Type in the port number on your outgoing e-mail account specified in the Outgoing Mail Server box. The default for most accounts is 25.
Login Information
User Name* - Type the user name that was provided by your ISP or mail administrator.
Password - Type the password that was provided by your ISP or mail administrator or the password that you created
Secure connection using SSL/TLS should be used - If using Outlook Exchange, and your Exchange administrator tells you to use a Secure Sockets Layer (SSL) connection, select the "Secure connection using SSL/TLS should be used" check box.
Test Account Settings
After completing the e-mail account configuration, use the Test Account Settings button to send a test e-mail using the entered settings. Check the "With Attachment" check box to verify the account's ability to send file attachments.
Text Messaging Settings
Use the following settings to configure your cellular telephone text messaging device with AccuZIP6 5.0.
Cell Phone Number - Type your cellular telephone number without any dashes or other symbols. Include the area code. For example, 8051234567.
Carrier - Select your cellular service carrier from the pull-down menu. If your carrier is not listed, choose "Other" and enter the domain used by your carrier to send text messages.
Once your text messaging account has been configured, use the "Test Messaging Settings" button to send a test message from the software.
After performing all of the setup options found within the Account Setup window, you're ready to use the Special Script Features within AccuZIP6 5.0!