AccuZIP6 5.0's Label Designer makes defining the Page Layout and Page Setup simpler than ever. The Label Designer is where you'll be able to define the exact settings of the template you're using, as well as adjust the individual label height, number and size of columns in a custom environment, and assign individual printer drivers to templates. It is recommended that you first use the Label Layout Assistant found in the Creating a New Label Template topic, as most of these procedures are taken care of automatically for you. However, if you simply want to modify a pre-created template or one of your own creation, you'll find the information within this topic useful.
Identifying the Page Layout Bands
We'll begin from the Print Settings window. If you're not currently in the Print Settings window, click on the Labels button (if operating from within a presort) or File>Print>Labels (if operating from within the List View). Once in the Print Settings window, follow the instructions below to adjust your page layout and setup.
Select your desired label template from the Template pull-down menu. For the purposes of this topic, we'll use the 5161.lbx template.
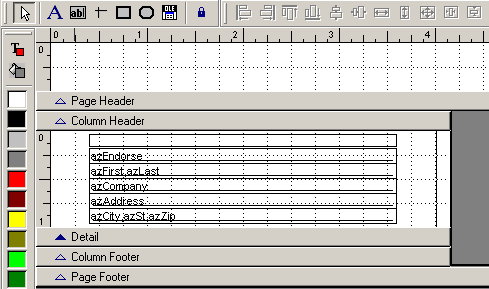
Click on the Edit button to open the Label Designer. The Label Designer is shown below:

Now that you're in the Label Designer, you will notice the gray bars (called "bands") stretching horizontally across the screen. These bands govern the vertical height of various parts of a template. A description of each of the bands is provided below:
Title (not pictured) - A Title band can be created for various purposes. You may wish to insert a cover paragraph on the first page of a label sheet or report, or maybe just the client's name at the top of the label print job with a job description. For instructions on creating a Title band, see Creating a Title or Summary Band.
Page Header - At the top of the template is a Page Header band. A Page Header usually contains a combination of fixed and variable data or blank space. A Page Header on a report might include the report title, date or page number. A label typically won't need a Page Header unless the labels are setup on cut sheet laser printers and have a margin at the top of the sheet. Continuous feed labels typically do not include a Page Header. The Page Header band can be adjusted to allow for the unprintable area at the top of the page.
Column Header - If you select more than one column for your report or label, you have the option to include a heading at the top of each column that will print on every page. The Column Header information should be typed in using the Text Tool on the Tool Bar. See Formatting Text and Objects for information on using the Text Tool. For information on adding columns, see Page Setup later in this topic.
Detail - The Detail band is the physical area of a label or report template. This area usually includes fields and/or text objects, but it can also include graphics. The Detail band in a label template will typically include the address block data: barcode, endorsement, name, address, city, state, and zip. The Detail band in a report will typically include the fields that are to be the body of the report.
Column Footer - When you include more than one column in a report or label, each column can have a footer. Footers typically display summaries and/or subtotals of the information in the column. To add columns to a report or label see Page Setup later in this topic.
Page Footer - At the bottom of the template is a Page Footer band. The Page Footer usually contains a combination of fixed and variable data. A Page Footer on a report might include the report name, date, or page number. A label typically won't need a Page Footer unless the labels are set up on cut sheet laser printers, and have a margin at the bottom of the sheet. Continuous feed labels typically do not include a Page Footer. The Page Footer band can be adjusted to allow for the unprintable area at the bottom of the page.
Group Header (not pictured) - If you use the Data Grouping feature, your label or report designer will have a Group Header band displayed. Group Headers are used to organize a label or report by the fields specified within each level of grouping. Data Grouping requires knowledge of Microsoft Visual FoxPro and we recommend that you contact AccuZIP6 Technical Support for guidance and custom label or report creation.
Group Footer (not pictured) - If you use the Data Grouping feature, you will have a Group Footer in addition to the Group Header band. Group Footers typically display summaries or subtotals for each level of data grouping. As with Group Headers, knowledge of Microsoft Visual FoxPro is required, and we recommend contacting the AccuZIP6 Technical Support staff.
Summary (not pictured) - The Summary is one or more pages that appear after the main report. It can contain summary information (totals or averages), or text that summarizes the contents of the report. Like the Title band, it is printed once per label or report printing. See the topic Creating a Title or Summary Band for instructions on creating a Summary band.
Modifying the Band Height
There are two methods to modify the height of the individual bands: either clicking and dragging a band to the desired position, or double-clicking the band and inputting an exact value. The latter is the recommended method for modifying the height of each band, as you can be very precise with the height of the band, allowing greater flexibility and efficiency while designing your labels. You can, however, use the grid lines and the rulers shown down the left edge of the Label or Report Designer for guides if you choose to use the click-and-drag method.
Clicking and dragging is very straightforward--click on the band and drag it up and down.
For the more detailed double-click method, follow the instructions found below:
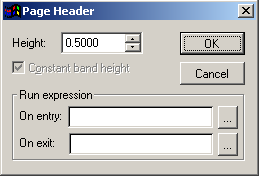
While in the Label Designer, double click the desired band. Using the above image, we'll focus on the Page Header band for the purposes of this guide. You'll be presented with the Page Header height window:

Adjust the height of the Page Header band by highlighting the 0.5000 and typing in the desired value.
|
|
If you're an experienced Visual FoxPro user, you can use custom expressions under the "Run expression" area. Simply enter your desired expressions for entry and exit. |
This method can be used for all bands found within the Label Designer.
Adjusting the Page Layout
The Page Layout window allows you to determine the number, width, and spacing of the columns in the label or report, as well as the left margin of the entire page. This section will instruct you on how to modify these settings.
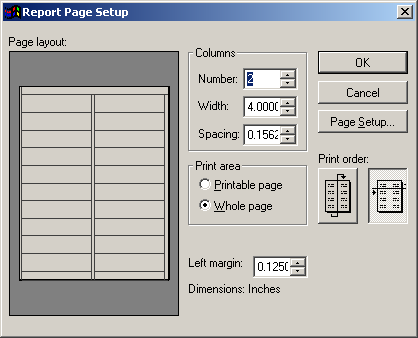
From the File Menu while in the Label Designer, select Page Setup. The Page Setup window will appear:

Adjust the Page Setup using the options found in the window: Number of Columns, Column Width, Column Spacing, Printable Page or Whole Page, Left Margin, and the Print Order. Each of the values found in the Columns area is a "spinner", meaning the settings can be changed by highlighting the current value, and then typing the desired number. A secondary method would be to click on the spinner's up and down arrows to the right of the value, which raise it in predetermined increments. A description of the settings follows:
Columns
Number - The Number spinner allows you to specify the number of columns in the label or report.
Width - This spinner allows you to specify the width of the individual columns.
Spacing - The spacing spinner allows you to modify the width of the space between the columns.
Print Area
Printable Page - If you choose the Printable Page option, AccuZIP6 5.0 will adjust the Page Layout to fit within the constraints of the template's currently assigned printer driver and paper size. A rectangle shown on the page preview area to the left represents the printable page margins.
Whole Page - If you select the Whole Page setting, the edges of the actual page will be adjusted to the absolute minimum margins for the Page Layout. Some printers cannot print to the extreme edge of the page, but AccuZIP6 5.0 will use the page in its entirety for its printing. If your printer model cannot print to the entire page, select the Printable Page option.
Left Margin
Left Margin - The Left Margin spinner allows you to adjust the margin on the left side of the entire sheet.
Print Order
Print Order - The Print Order selection in the Page Setup window displays a graphic button demonstrating the order that the labels will print in. When using multiple columns, the first button will print the labels down in each column before moving to the next. Using the second option will print the labels across in rows prior to moving down to the next row.
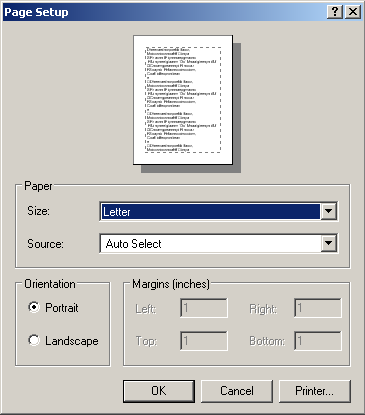
Click OK to return to the Label or Report Designer, or click the Page Setup button to access the next window in the Page Setup process. You'll be presented with the next Page Setup window:

This area of the Page Setup allows you to modify the available paper sizes, as well as the source from the currently selected printer driver. To change the printer driver that the current template will print to, click on the Printer button and select the new printer.
When you're finished modifying the band heights and the Page Setup, you can click OK on any Page Setup windows to return to the Label Designer and either continue adjusting the content, or close and save the template.