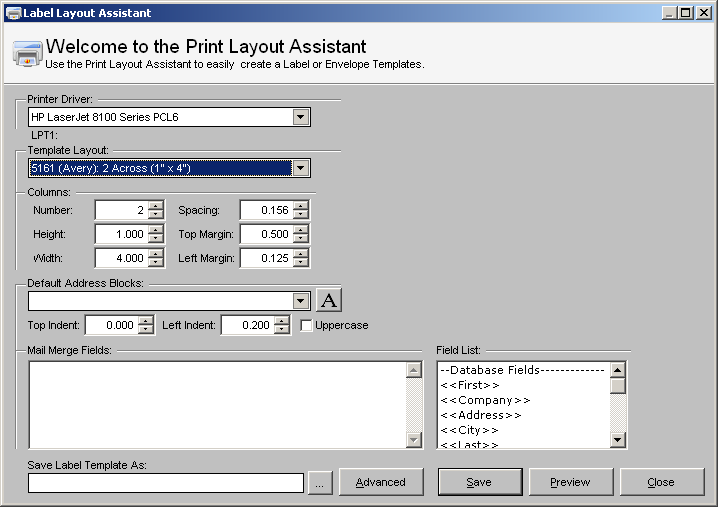
Click on the New button ![]() . You will be presented with the Label Layout Assistant window:
. You will be presented with the Label Layout Assistant window:
Creating a new label template in AccuZIP6 5.0 has never been easier! For most users, the powerful Label Layout Assistant will allow you to create impressive labels in an easy-to-use interface. Define the default printer, the default Avery Label layout, and even modify the column properties and content placed on the label before ever even entering the Label Designer. To get started using the Label Layout Assistant, you'll first need to know what basic format of label you are using. If you're not sure, the Template Layout will give you guidelines: the Avery Label equivalent number (which most standard labels have on the box), the number of columns, and size per label. For the purposes of this topic, we'll choose to create and modify a 5161 template, and create a custom address block.
Creating the Template
To create your custom template, you'll first need to be at the Print Settings window. If you're not in the Print Settings window, click on the Labels button from the Print Presort window (if operating from within a presort), or File>Print>Labels if operating within the List View).
Click on the New button ![]() . You will be presented with the Label Layout Assistant window:
. You will be presented with the Label Layout Assistant window:

The Label Layout Assistant makes it easy to specify the exact dimensions of your label. Begin by selecting the desired printer that you'll be printing to.
From the "Printer Driver" pull-down menu, select your desired printer driver that is installed on the system.
The printer driver pull-down will list the actual drivers installed in the Windows Control Panel. If you do not see your printer listed, you'll need to install the recommended manufacturer printer driver for your printer model first.
Next, the appropriate Avery Label equivalent will be selected. If you don't know the Avery Label number, you can review the basic descriptions that are included with each template name. The description will tell you if it's a 1 Across (1 column) label, or 2 Across (2 column), etc., as well as the individual label size.
Modifying the Column Dimensions
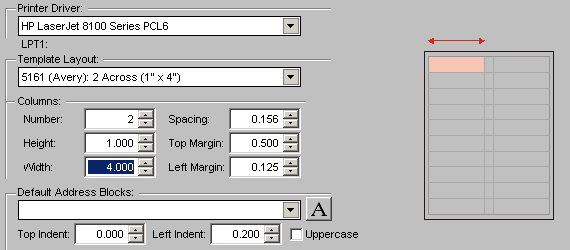
It's possible to adjust every aspect of the column alignment and size within the Label Layout assistant by using the easy-to-read Columns section, complete with a visual diagram that appears on the right when you set one of the column boxes to active, as shown in the image below:

Using the column setting text boxes in conjunction with the diagram that appears to the right with any box active, it's very simple to set up the specific dimensions of your templates. Description of the settings are found below:
Number - Adjusts the number of columns on your label sheet.
Height - Adjusts the height of each individual label.
Width - Adjusts the width of each column. The setting is universal for all columns, so you only set the width once.
Spacing - Adjusts the spacing between columns, creating a "gutter" of unprintable area in case your label sheet has center dividers between the labels.
Top Margin - Adjusts the margin from the top of the label sheet to the top of the first row.
Left Margin - Adjusts the margin from the left side of the sheet to the left side of the first column.
|
|
It's recommended to start with the left side of the Columns area to define the number of columns and individual label size, and then move to the right side with spacing, top margin, and left margin. Start small, making sure that your label dimensions are correct. After you're certain that your label measurements are accurate, you can then adjust the formatting of the sheet as a whole. This will help avoid confusion with measurements that "don't add up" on your paper size. |
From the "Template Layout" pull-down menu, select your desired label template format. For the purposes of this help guide, we're going to choose a standard 5161 template, which is the most common 1" x 4" 2 column label format.
After choosing your template, you'll notice the Columns section updates with the appropriate information. You can modify the settings as you see fit. The pre-created Avery Label equivalents that are generated by default, however, will already have the correct column settings.
Default Address Block Creation
Creating one of the standard address blocks within the Label Layout Assistant couldn't be easier. Choose your font, the pre-created address block of your choice, and that's all there is to it! You can even modify the information after it's placed into the Mail Merge Fields area to create a customized version of the default address blocks. Follow the instructions below to create a basic address block:
In the Default Address Blocks area, click on the Font button ![]() . The fonts window will appear.
. The fonts window will appear.
If you desire a specific font, select it from the Font list. Choose the desired font style and size, and then click OK.
From the Default Address Blocks pull-down menu, choose your desired Address block. Descriptions of the address blocks are found below:
Basic Address Block - Creates a simple, 3-line address block with First and Last, Address, and City-St-Zip. Useful for non-barcoded First Class Single Piece Labels for a residential list.
Address Block with Company - Creates a 4-line address block with First and Last, Company, Address, and City-St-Zip. Useful for non-barcoded First Class Single Piece Labels for a commercial list.
Address Block with Endorsement - Creates a 5-line address block with Endorse, First and Last, Company, Address, and City-St-Zip. A standard non-automation label for many classes of mail.
Address Block with Barcode - Creates a 5-line address block with Barcode, First and Last, Company, Address, and City-St-Zip.
Address Block with Endorsement & Barcode - Creates a 6-line address block with Barcode, Endorse, First and Last, Company, Address, and City-St-Zip.
My Address Block - After modifying any address block settings, you can select this option to save it as the default "custom" address block, which can be recalled any time in the future by selecting My Address Block in the Label Layout Assistant.
After selecting your default address block, you can also adjust the indent of the text on the label itself by using the "Top Indent" and "Left Indent" settings. Be aware that the settings are for the upper left corner of the address block, so you'll want to take into account a width of approximately four inches for the default address blocks at creation. On the standard 5161 layout, a small indentation of .2 inches on both top and left indent works quite well.
After selecting your address block and indent settings, your Mail Merge Fields area will resemble the following image (shown using the Address Block with Endorsement & Barcode setting):

That's all there is to it! Creating the address block for most standard labels is easy and efficient within the AccuZIP6 5.0 Label Layout Assistant!
Saving the New Template
After you've selected a template default, assigned the column dimensions, and chosen a default address block, the only thing left to do is save the template. Follow the instructions below to create your first customized label--you're almost done!
In the "Save Label Template As:" text box, type your desired label name. It is recommended to avoid using symbols in the template names other than the pound sign (#), underscore (_), or hyphen (-). Using symbols other than those noted can create issues. Specifically, things like a period in the template name (5162 8.5 X 11.5, for example, would save as "5162 8.lbx", stopping at the first period). Avoid using symbols in template names whenever possible, but spaces and alpha/numeric characters are perfectly fine.
For our sample 5161 template, we've named the file "Tutorial 5161" and we're ready to save!
![]()
Clicking the Save button at this point will save the template and return you to the Print Settings screen, where you'll automatically have your new template selected in the template pull-down menu.
You're now ready to print, congratulations!
You can also create custom content and use advanced features within the Label Layout Assistant. For information on customizing the address block with database or presort fields and custom text strings, see Advanced Label Layout Assistant Editing.