In AccuZIP6 5.0's Label and Report Designers, it's easy to add static text and graphic images to your labels and reports. Using the Report Controls toolbar (pictured below), you can easily add fields, lines, text, shapes, pictures, and more. Detailed descriptions of the buttons and their uses are found in this topic.
This Report Controls toolbar is located at the top of the Design View, and allows you to modify the content found on your label or report. The individual button purposes are as follows:
Object and Shape Creation Tools
|
Select Objects - Allows you to select objects before moving or resizing them. This feature is explained in Formatting Text and Objects. |
|
Label - Adds a static text object to the template. To use the tool, click on the Label button and then click in the location where you wish to add the text. |
|
Field - Allows you to place fields from a database within the template. For complete instructions on adding fields in the Label or Report Designer, see Adding and Combining Fields. |
|
Line - Allows you to create custom lines within the Design View. To use the tool, click on the Line button to initiate the line controls. Click in the Design View where you want your line to begin, and drag the mouse to the desired ending location for the line. Release the mouse button, and the new line is created. |
|
Rectangle - Allows you to create a rectangle within the Design View. To use the tool, click on the Rectangle button to initiate the rectangle controls. Click in the Design View where you want your rectangle's upper left-hand corner to be, and drag the mouse to the desired location for the bottom right-hand corner. Release the mouse button, and the new rectangle is created. |
|
Rounded Rectangle - Allows you to create a rectangle with rounded corners within the Design View. Use the same method that was described in the Rectangle description above. |
|
Picture/OLE Bound Control - Allows you to insert an image file into the Label or Report Designer. To insert an image, use the following procedure: |
Click
on the Picture/OLE Bound Control
button ![]() .
.
Position the mouse where you want the upper left-hand corner of the picture to appear.
Click the left mouse button and drag to the lower right-hand corner of the desired picture location.
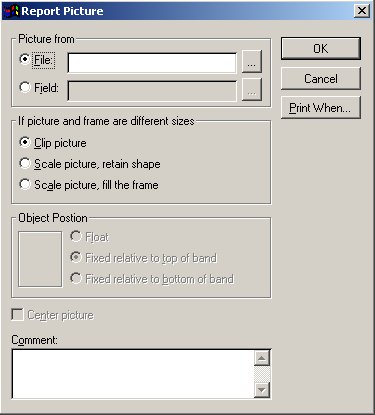
Release the left mouse button and the Report Picture window appears:

Choose the appropriate radio button in the Picture From area.
Choose File if you are selecting a single picture to be inserted into the label or report. The Field option is for the advanced AccuZIP6 5.0 or Visual FoxPro user, and it allows pictures to be placed from within a field in a database file. If you require additional information on this, please contact the AccuZIP6 Technical Support Department.
Select the desired option from the If picture and frame are different sizes area. Descriptions of the available options are found below:
Clip Picture - If the picture is bigger than the frame you created in the template, Clip Picture will show a section of the original image in the object frame, retaining the picture's original dimensions. The picture is anchored at the top and at the left of the frame. You cannot see the lower right portion of the picture that extends beyond the frame.
Scale picture, retain shape - Choosing Scale Picture – Retain Shape will display the whole picture, filling as much of the object frame as possible while retaining the proper aspect ratio of the picture file. This will protect the picture from vertical or horizontal distortion, or "stretching".
Scale picture, fill the frame - Choosing Scale Picture – Fill the Frame will display the whole picture in the object frame in the template. The picture will be distorted vertically and horizontally to fit the frame in most cases.
Interface Control Tools
|
Button Lock - The Button Lock tool allows you to lock the currently active tool. With the Button Lock off, the interface will default back to the Select Objects tool after creating a line, shape, or inserting an image. Enabling Button Lock will allow you to create multiple shapes without re-selecting the appropriate tool. The current creation tool will remain active until you manually enable the Select Objects tool. |
Using the tools described in this topic, you can create, resize, align, and position practically anything you wish within the Label and Report Designer!